

Last Updated: August 17, 2026
This guide explains how to respond to an undercover coverage check on your vets-api pull request. After reading it, you'll know how to interpret the check's output, add tests to resolve a flagged method, or request an exemption for code that cannot be unit tested.
Before you begin
-
This check runs automatically on every vets-api pull request. No setup is required on your end.
-
undercoveris advisory only — it will never block your merge. It posts a comment when it finds uncovered code in your diff and removes the comment when the diff is clean. -
The check only looks at code you introduced or changed in the PR. Pre-existing untested code outside your diff is ignored.
-
This check is separate from the existing 90%/93% overall coverage gate. Both run independently.
Step-by-Step Guide
Step 1: Read the undercover comment on your PR
After CI finishes, look for a sticky comment on your PR from github-actions. It will look like this:
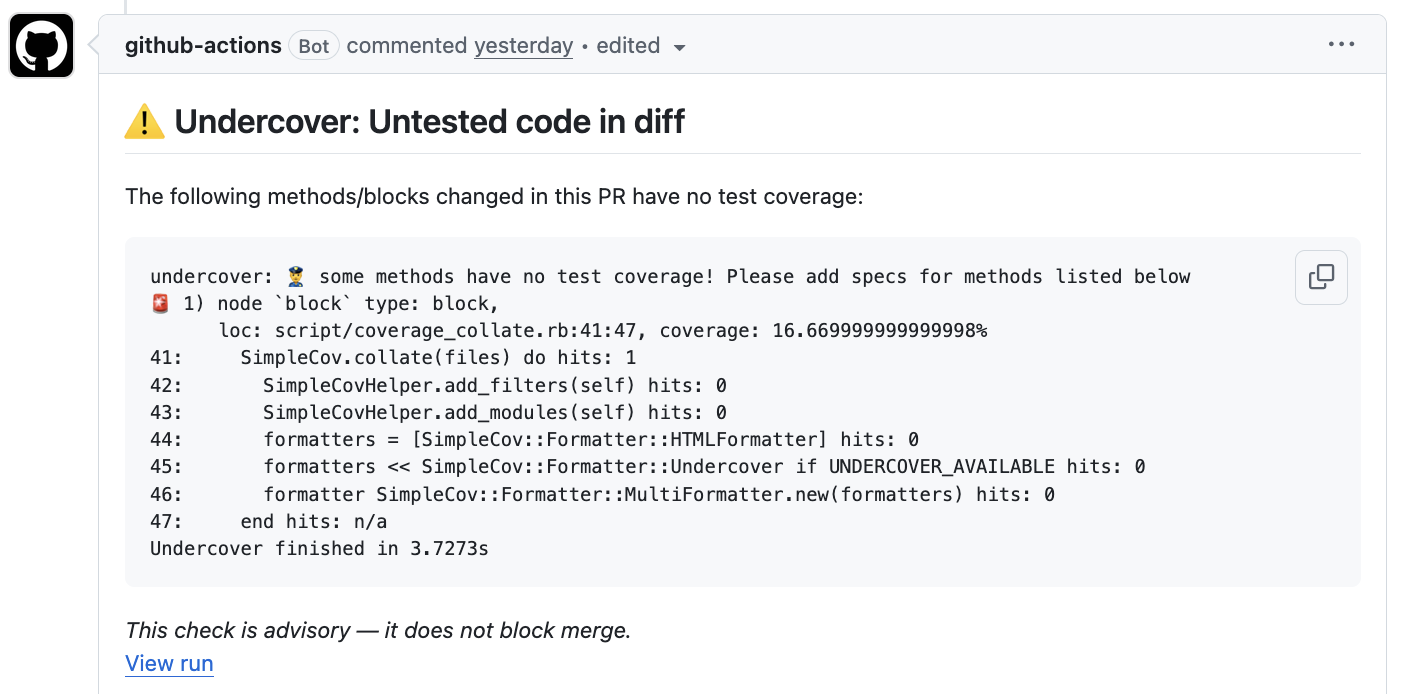
Each flagged item includes:
|
Field |
What it means |
|---|---|
|
|
The method or block with a coverage gap, and its line range |
|
|
Percentage of lines in that method or block that were hit during tests |
|
|
Per-line hit count from the coverage report |
A method with coverage: 0% was never called by any test. Partial coverage (e.g. 16%) means some lines ran but not all branches or paths were exercised.
If your diff is fully covered, no comment appears. If a comment was posted on a previous push and you've since added tests, the comment will remain on the next CI run.
Step 2: Decide how to respond
You have two options:
Option A — Add tests. Write specs that exercise the flagged method or block. Push the commit and let CI re-run. Once the coverage gap is resolved, the CI step automatically deletes the sticky comment from your PR.
Option B — Request an exemption. For code that genuinely cannot or should not be unit tested (infrastructure scripts, error handlers that require a live system, etc.), wrap the block in SimpleCov's :nocov: annotation:
# :nocov:
def my_infrastructure_helper(arg)
  # relies on live external system — not unit-testable
end
# :nocov:
undercover respects SimpleCov's exclusion rules. Anything wrapped in :nocov: will not appear in the flagged output.
Use :nocov: sparingly. It suppresses both the undercover check and the overall SimpleCov coverage count. If you're reaching for it because a method is hard to test, consider whether the method can be refactored to be more testable first.
Step 3: Verify the check is resolved
Push your updated commit and wait for the Publish Test Results and Coverage step in Code Checks to complete. Check the PR for the undercover comment:
-
Comment gone — the CI step deleted it automatically because the diff is clean. No action needed.
-
Comment updated — one or more methods are still flagged. Repeat Step 2 for the remaining items.
Configuring .undercover
The repo-level config lives at .undercover in the repo root.
This tells undercover where to find the SimpleCov JSON output produced during coverage collation. Changes to this file take effect on the next CI run — no workflow changes are needed.
Available options (passed as flags in .undercover):
|
Flag |
Description |
|---|---|
|
|
Path to SimpleCov JSON output file |
|
|
Exit 1 on Ruby parse errors (off by default) |
Rollout Plan
Current phase (8/2026) — Advisory: undercover runs and posts a comment but never blocks merge. The goal is to surface gaps, build awareness, and let teams get comfortable with the output before any gate is considered.
Next phase — Soft gate (TBD): After an advisory period, Platform will evaluate converting the check to a required status check. This will not happen without team discussion and advance notice in #vfs-all-teams.
Feedback: If the check is noisy, producing false positives, or the output is confusing, open a support ticket or post in #platform-cop-backend. The .undercover config can be tuned without touching the workflow.
Troubleshooting: bundle install fails with "CMake is required to build Rugged"
The undercover gem depends on rugged, which compiles native C extensions and requires CMake. If you see this error when running bundle install locally:
ERROR: CMake is required to build Rugged.
Install CMake for your platform, then re-run bundle install.
macOS
brew install cmake
Linux (Debian / Ubuntu)
sudo apt-get update && sudo apt-get install -y cmake
Linux (RHEL / CentOS / Fedora)
sudo dnf install cmake
or on older systems:
sudo yum install cmake
Windows
Using Chocolatey (installs cmake and adds it to the system PATH):
choco install cmake --installargs 'ADD_CMAKE_TO_PATH=System'
Or download the installer directly from cmake.org/download. During setup, select "Add CMake to the system PATH for all users" (or "for current user") — the default is "Do not add CMake to the system PATH", so this must be selected explicitly.
After installing, verify cmake is available:
cmake --version
Then re-run bundle install.
Help and feedback
-
Get help from the Platform Support Team in Slack.
-
Submit a feature idea to the Platform.