
Last Updated: May 8, 2025
The vets-api development, staging, sandbox, and production environments reside in EKS. This document provides background information on EKS and how to work with Vets API from the EKS infrastructure.
How does it work?
EKS
EKS is a managed service that you can use to run Kubernetes on AWS. It removes the need to install, operate, and maintain your own Kubernetes control plane. In the context of container orchestration, EKS streamlines infrastructure by unifying key components automatically.
ECR
ECR is an AWS manager container image registry service. A registry exists for the Vets API-specific images in ECR. When the docker image is built upon push to the master branch, an image is pushed to the Vets API ECR registry.
ArgoCD
ArgoCD provides a UI for developers to see the application and manages the deployment by checking the desired state against the deployed state.
GitHub Actions
Vets API in EKS utilizes GitHub Actions to build and update the docker image when a change is pushed to the master branch.
Helm charts
The vets-api EKS deployment utilizes a custom helm chart that resides in the vets-api repository. The vets-api manifest files then reference the helm chart package and custom values are passed to the chart.
Utilizing a helm chart simplifies the deployment, maintainability and reduces repeated code. vets-api-server (puma) and vets-api-worker (sidekiq) are bundled into the same parent helm chart.
More on helm charts here.
Access
Access to the vets-api EKS applications is managed via GitHub teams (linked below). To obtain access, fill out a Vets-api ArgoCD terminal access request form.
Prod access is not available for VFS team members, please coordinate with your nearest Federal engineer for assistance
Vets API GitHub teams
Terminal access
Links to Vets API in ArgoCD. All links are only available behind the VA network (AVD, CAG, or a GFE laptop).
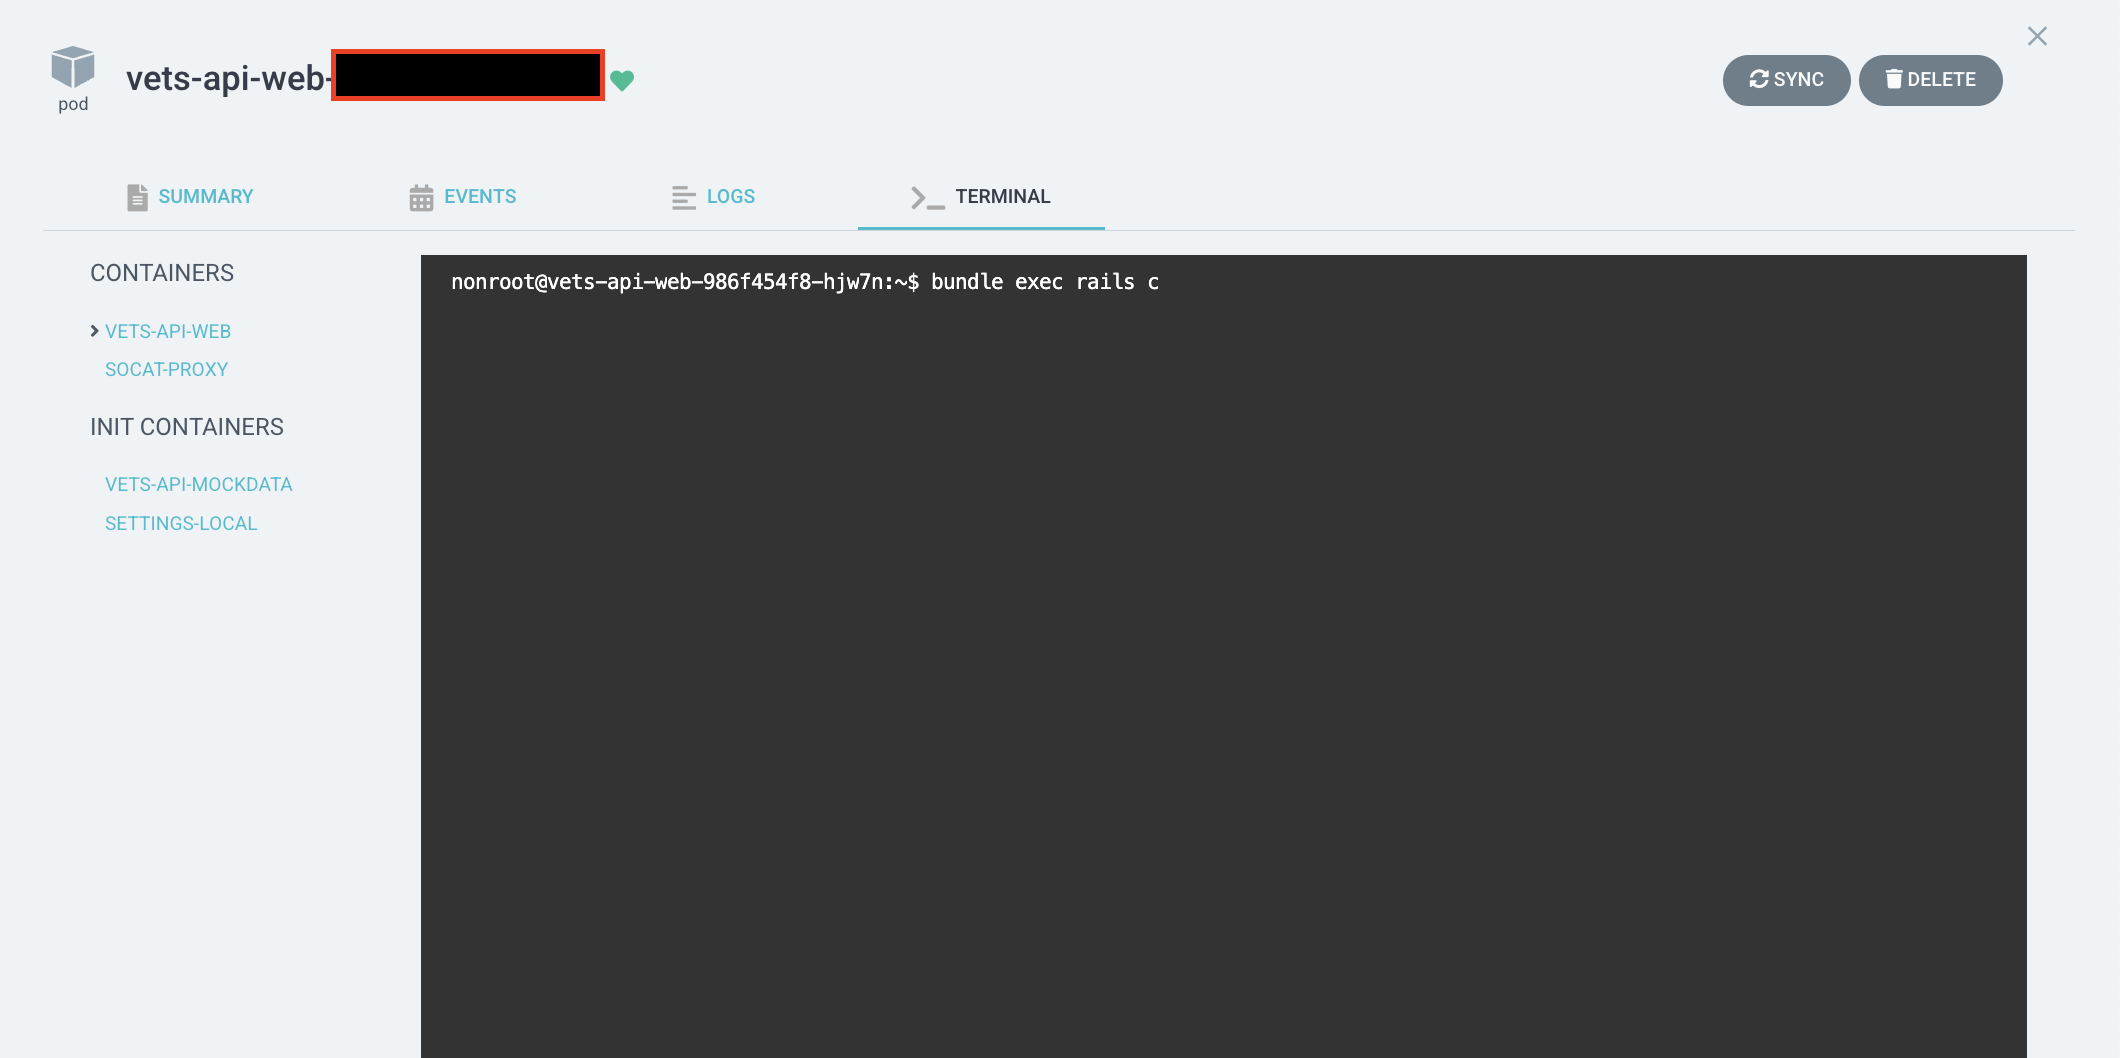
Access the terminal via Argo
-
Click on a link above for the desired environment.
-
Click on a
vets-api-web-*pod (towards the right; look for the pod icon). -
Click on the Terminal tab on the far right.
If you get an error or don't see the tab, log out/in of ArgoCD. If that doesn’t work, double check that you are a member of the GitHub team for the environment you’re in.
Rails console access
-
Follow the steps above.
-
Run
bundle exec rails c.
Secret values
The vets-api deployment utilizes secret references via ExternalSecret resource. Reference Settings and Parameter Store to add a secret or Setting.
Adding a cert
For adding certs, check out How to add secret files to Vets-API. It’s uncommon, but these instructions are for adding a cert or other item that needs to end up at a very specific mount path in the pod.
Vets API EKS deploy process
How it works
Vets API deploys from the master branch. The deploy process involves GitHub Actions, ECR, yaml manifests, and ArgoCD.
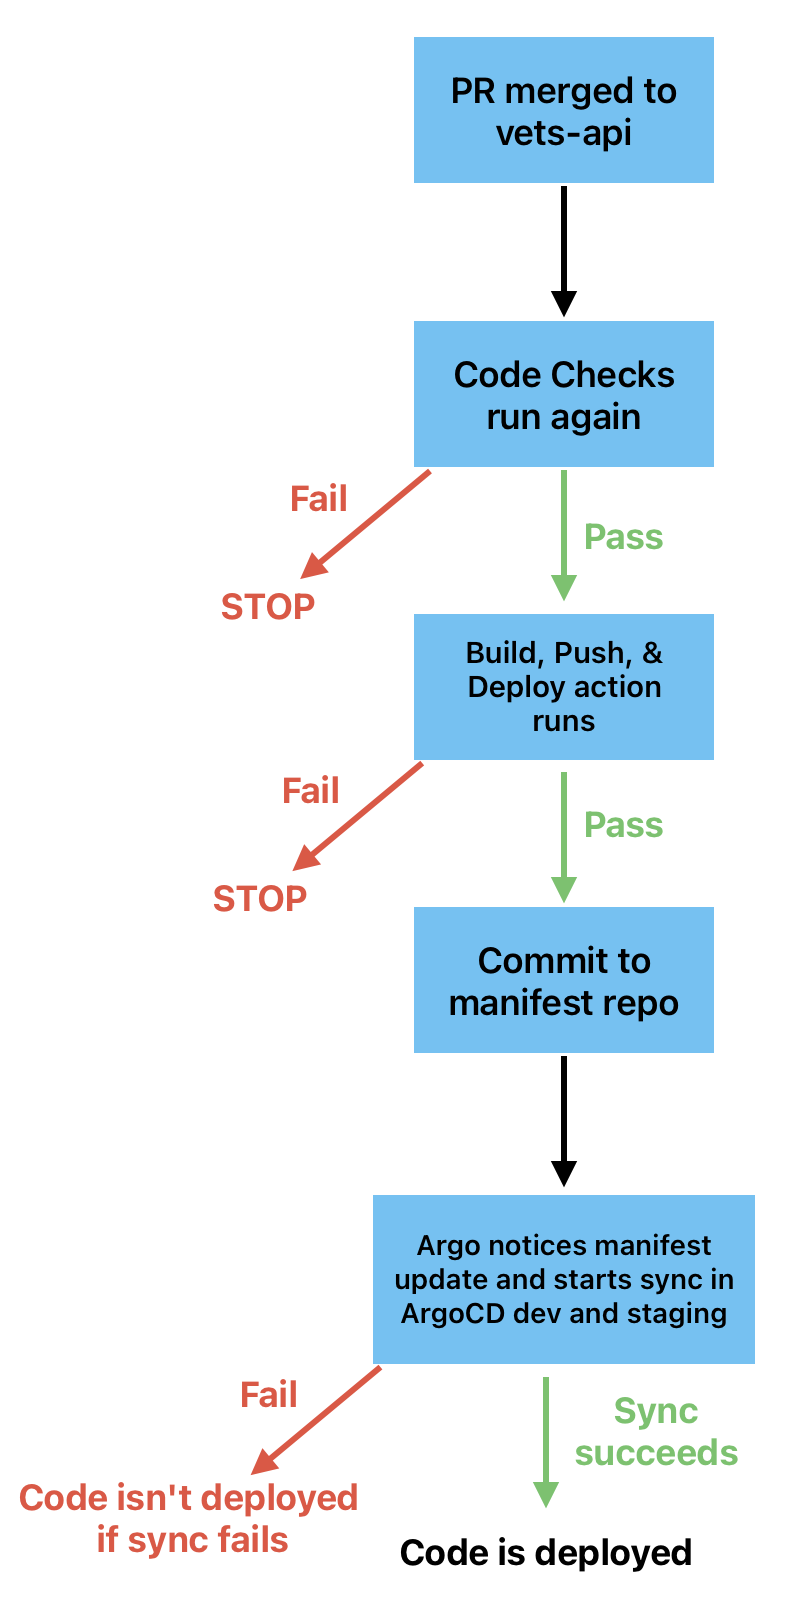
Deploy process overview (diagram + description)
-
A change is merged to the master branch via a PR.
-
Post-merge CI runs. (Those checks can be seen here). If Code Checks fails, the process is halted here (see note below for more details).
-
If tests pass, the Build, Push, & Deploy action is automatically started, which updates the image tag in the manifest repo with a commit (“Release… for vets-api… <vets-api sha>”). If this action fails, the process is halted here (see note below for more details).
-
Argo notices the new commit and syncs vets-api dev and staging (both links are only accessible behind the VA network [AVD/CAG/GFE]).
-
vets-api is configured to autosync vets-api dev and staging upon a change to the manifest file. (
autosync_enableddefaults to true). Prod and sandbox follow this schedule.
-
-
Once the sync finishes and all pods are replaced, the commit(s) have been completely deployed.
-
The deploy-status dashboard is the source of truth.
-
Note: If a PR fails at either step 2 or 3, but then a PR that merges after the failed one passes both of those steps, all commits up to and including the one that passed will be deployed.
Deploy process details
The Rolling Update
Vets API on EKS utilizes a rolling update pattern to ensure zero downtime and no disruption to service. This incrementally replaces pods with new ones while gracefully draining connections on pods rolling out of service. More on rolling updates here.
Bulkhead Deployment Pattern
The Bulkhead deployment pattern, utilized in our production environment, acts as a safeguard mechanism, compartmentalizing sections Vets API through defined ingress routes. This guarantees fault tolerance, meaning that even if a set of pods were to have an issue, the overall application remains undisturbed, ensuring consistent performance levels. Currently, several latency-prone and high-traffic routes are directed to their dedicated bulkheads.
Metrics related to the current bulkhead deployments can be viewed on this Datadog dashboard (Datadog access required). We manage these bulkheads through ingress routes, service classes, and distinct pod deployments managed by ReplicaSet resources. Ultimately, we aim to have most distinct logical code grouping or product catered to by an individual bulkheads (e.g., the modules in Vets API), which would create an illusion of fault-tolerant microservices. Currently, a number of routes benefit from the bulkhead deployment pattern, providing greater benefit overall such as log segregation, increased resiliency and simplified debugging. All “common” routes funnel to the vets-api-web pods. Detailed definitions of our existing bulkheads can be found here defined under the webServices key.
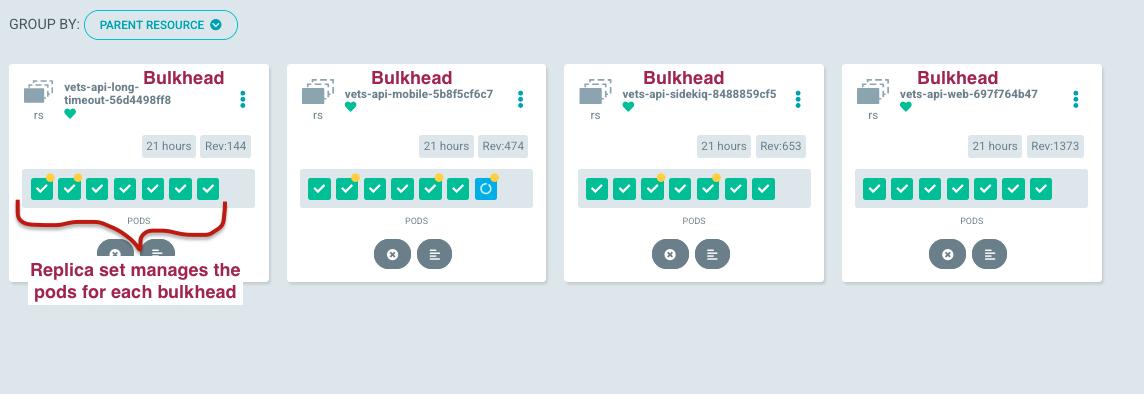
Bulkhead image visualized
The image below showcases bulkhead deployments using pod view grouped by Parent Resource in prod Argo CD (only accessible behind the VA network [AVD/CAG/GFE]). This structure uses a ReplicaSet to guarantee a consistent number of running pods within each bulkhead. Furthermore, the ReplicaSet actively preserves the desired pod replicas count, ensuring resilience and constant availability. Every bulkhead scales autonomously based on custom Datadog metrics related to available puma threads.
ClamAV
Prior to EKS, ClamAV (the virus scanner) was deployed in the same process as Vets API. With EKS, ClamAV is broken out into a sidecar deployment that lives on the vets-api server and worker pods. See ClamAV repo for further details. Essentially, this pattern allows us to extract the ClamAV service outside of Vets API to adopt the single responsibility pattern.
ClamAV is updated on the hour, every hour to ensure that the signature database is up to date via the mirror-images.yml and ci.yml Github Actions. Essentially, this follows the same deployment pattern as Vets API where images are pushed to ECR and the VA VSP BOT updates the manifest with the new image tag.

Help and feedback
-
Get help from the Platform Support Team in Slack.
-
Submit a feature idea to the Platform.