VA Forms Library - How to include view-only data
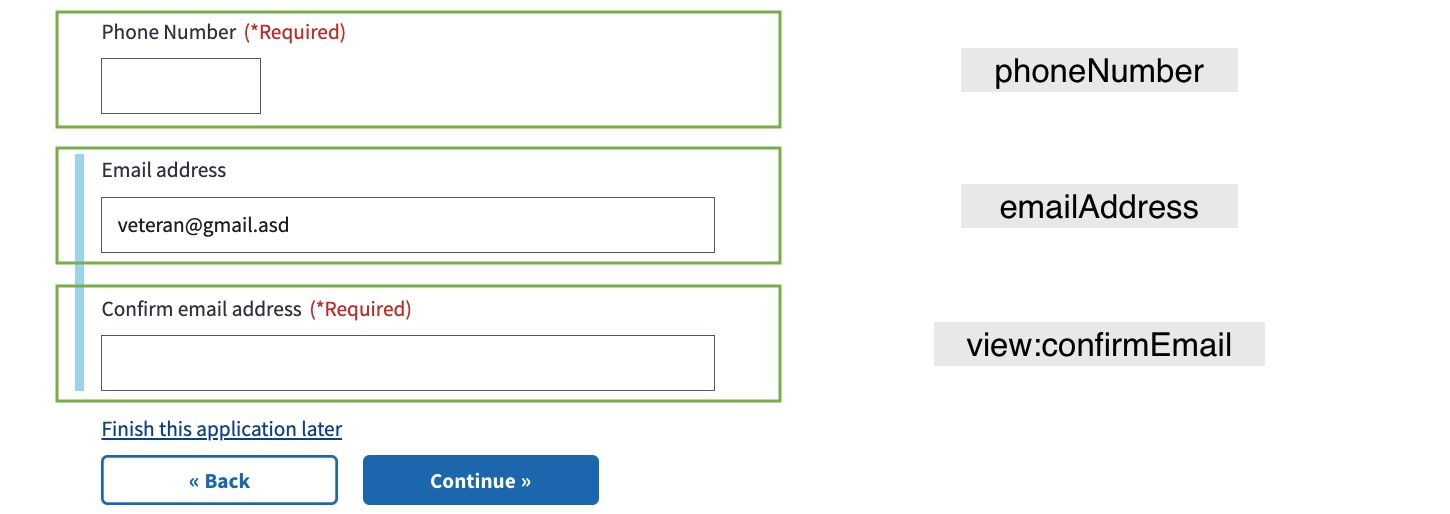
Sometimes you may have fields that you don't need to submit along with the form data, such as an email confirmation field. And sometimes, you may want to display data that the VA already has on file, such as a name, date of birth, gender, etc. Here are the solutions to those scenarios:
Creating fields without submitting on form data
In some cases, you may have fields that you don't need to submit along with the form data. We can config the schema and uiSchema to the following:
Object | Description | Example |
|---|---|---|
schema | To create a view-only field and keep it from being submitted, you can prefix it with When we prefix the field with |
JS
|
uiSchema | We can config the uiSchema of a view-only field the same way we config it with regular fields. For example, you can set the following properties on uiSchema: Note: You can hide or show the view-only data by configuring |
JS
|
Here is a code example where the view:confirmEmail field will not be submitted on the form data:
page1: {
  path: 'first-page',
  title: 'First Page',
  uiSchema: {
    email: {
      'ui:title': 'Email',
    },
    'view:confirmEmail': {
      'ui:title': 'Confirm email'
    }
  },
  schema: {
    type: 'object',
    properties: {
      email: {
        type: 'string'
      },
      'view:confirmEmail': {
        type: 'string'
      }
    }
  }
}
Since we've prefixed confirmEmailwith view:, that field will be removed before submitting the completed form.
If you prefix an object with view:, something slightly different will happen:
page1: {
  path: 'first-page',
  title: 'First Page',
  uiSchema: {
    email: {
      'ui:title': 'Email',
    },
    'view:confirmEmail': {
      'ui:title': 'Confirm email'
    }
  },
  schema: {
    type: 'object',
    properties: {
      'view:emails': {
        email: {
          type: 'string'
        },
        'confirmEmail': {
          type: 'string'
        }
      }
    }
  }
}
In this case, the form data that's submitted when a user completes a form would be:
{
  email: 'test@test.com',
  confirmEmail: 'test@test.com'
}
If we had left off the view:prefix it would be:
{
  emails: {
    email: 'test@test.com',
    confirmEmail: 'test@test.com'
  }
}
That should get you started with some of the common validation and conditional field scenarios. Many of the options above have extra parameters or options that may help with some less common scenarios, so make sure to check the Form Config Options page for a full picture of all the options offered.
Example from a current Form Application
This is an example from the Veteran Information page on the 686C-674 Form, which is used to add or remove a dependent on VA disability benefits.

From the formConfig for the 686C-674 Form:
The formCofig below uses veteranAddress to render the form as it appears in the screenshot.
import {
  ...,
  veteranAddress,
} from './chapters/veteran-information';

const formConfig = {
  ...
  chapters: {
    ...
    veteranInformation: {
      title: "Veteran's information",
      pages: {
        ...,
        veteranAddress: {
          path: 'veteran-address',
          title: 'Veteran Address',
          uiSchema: veteranAddress.uiSchema,
          schema: veteranAddress.schema,
        },
      },
    },
    ...
  },
};

export default formConfig;
From veteranAddress of the 686C-674 Form:
The uiSchema of view:confirmEmail has the following properties: ui:required , ui:validations, ui:title, and ui:options.
export const uiSchema = {
  veteranContactInformation: {
    veteranAddress: addressUISchema(
      true,
      'veteranContactInformation.veteranAddress',
      () => true,
    ),
    phoneNumber: {
      'ui:required': () => true,
      'ui:title': 'Phone Number',
      'ui:options': {
        widgetClassNames: 'usa-input-medium',
        updateSchema: () => {
          return {
            type: 'string',
            pattern: '^\\d{10}$',
          };
        },
      },
      'ui:errorMessages': {
        pattern:
          'Please enter a 10-digit phone number without dashes or spaces',
        minLength:
          'Please enter a 10-digit phone number without dashes or spaces',
        required: 'Please enter a phone number',
      },
    },
    emailAddress: emailUI(),
    'view:confirmEmail': {
      'ui:required': formData =>
        formData.veteranContactInformation.emailAddress !== undefined,
      'ui:validations': [
        (errors, fieldData, formData) => {
          if (
            formData?.veteranContactInformation?.emailAddress.toLowerCase() !==
            formData?.veteranContactInformation?.[
              'view:confirmEmail'
            ].toLowerCase()
          ) {
            errors.addError('Please ensure your emails match');
          }
        },
      ],
      'ui:title': 'Confirm email address',
      'ui:options': {
        expandUnder: 'emailAddress',
        expandUnderCondition: emailAddress => {
          return emailAddress;
        },
      },
    },
  },
};
Creating a block of text with no associated fields
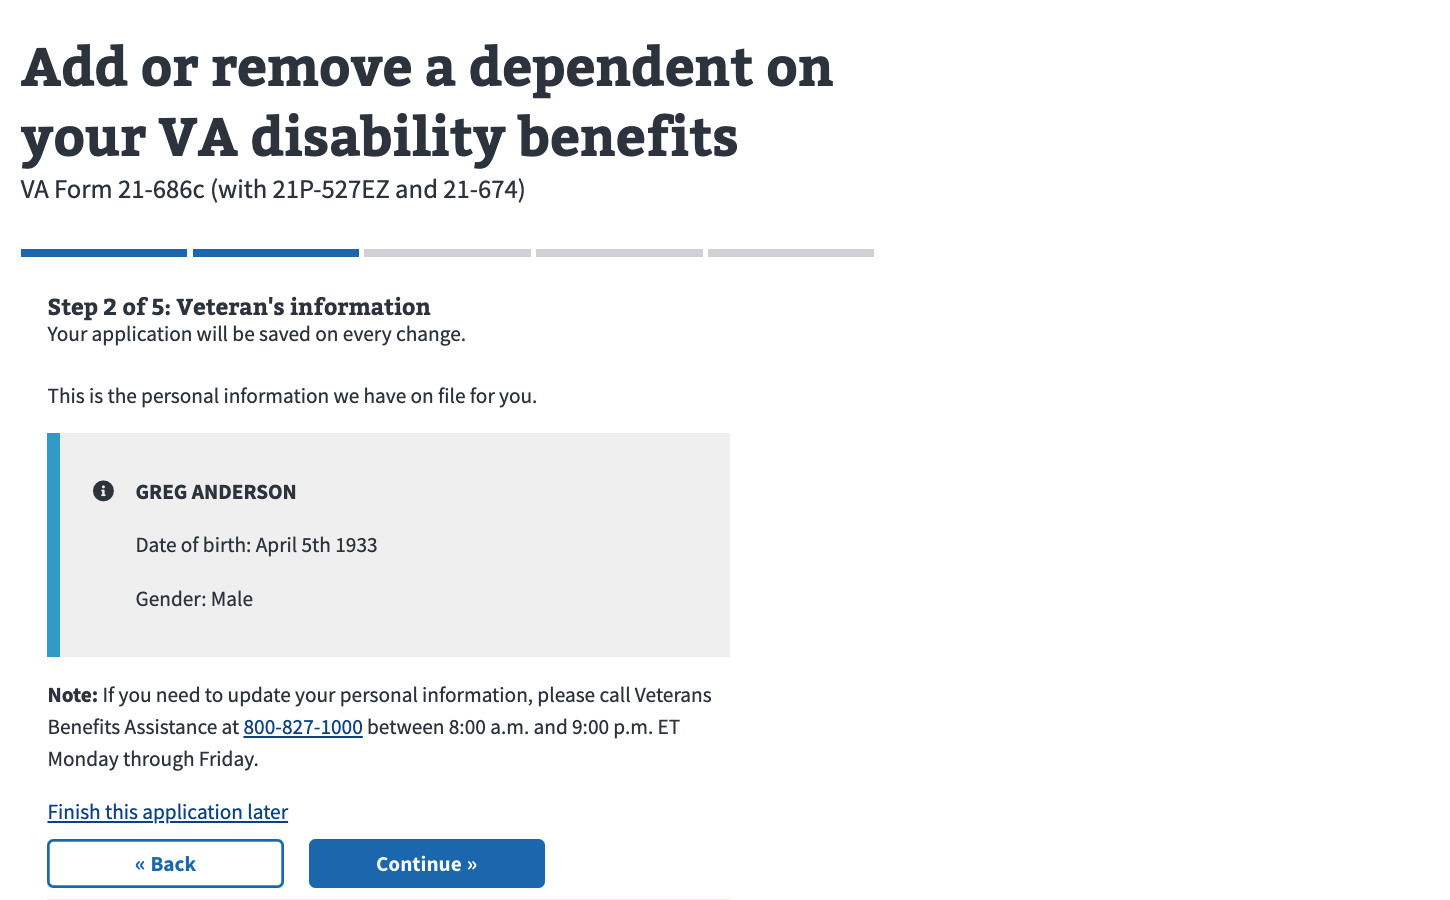
Sometimes forms do not want to ask for things like biographical data, instead choosing to display things the VA already has on file such as name, date of birth, gender, etc. In this instance, one approach is to include a React component that hooks into the Redux store and pulls user profile information.
To create a block of ready only text, we set the schema and uiSchema to the following:
Object | Description | Example |
|---|---|---|
schema | Create an empty view object by setting type to The naming convention of the object is to have the name prefixed with |
CODE
|
uiSchema | Use 'ui:description' to show text or a custom component before the fields in a particular object in the schema. Note: You can also set ui:option on this object the same way you set it with regular fields. For example, you can hide or show the view-only data by using |
CODE
or
CODE
|
Here is a code example that shows a block of read only text:
// schema
{
  type: 'object',
  properties: {
    'view:textObject': {
      type: 'object',
      properties: {}
    }
  }
}
// uiSchema
{
  'view:textObject': {
    'ui:description': 'My text'
  }
}Example from a current Form Application
Example 1
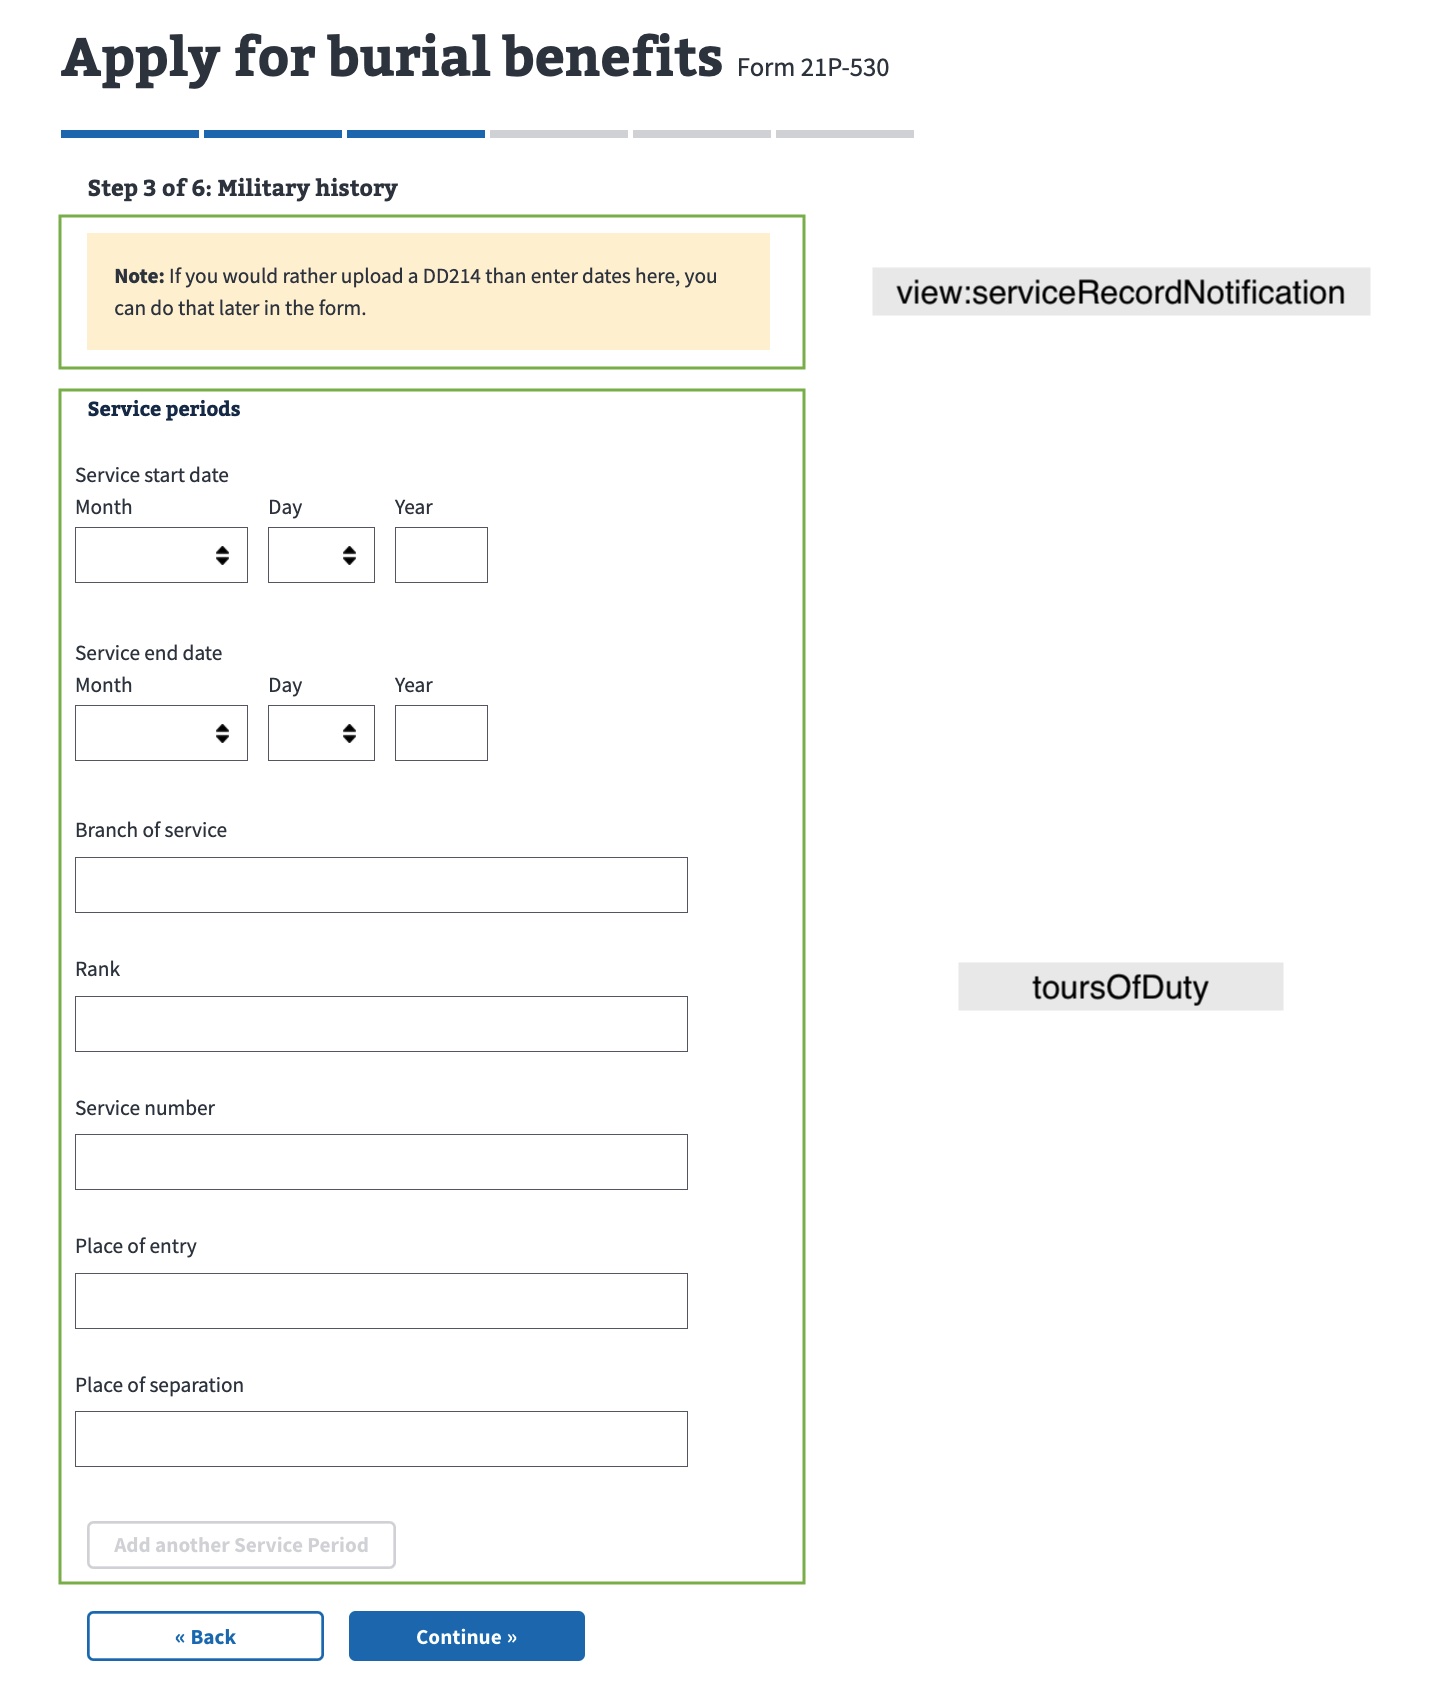
This is an example from the Military History page on the 21P-530 Form, which is used to apply for burial benefits.

From the serviceRecordNotification component of the Burial Benefits 21P-530 Form:
export const serviceRecordNotification = (
  <div className="usa-alert usa-alert-warning background-color-only">
    <span>
      <strong>Note:</strong> If you would rather upload a DD214 than enter dates
      here, you can do that later in the form.
    </span>
  </div>
);
From the formConfig for the Burial Benefits 21P-530 Form:
...
const formConfig = {
  ...
  chapters: {
    ...
    militaryHistory: {
      title: 'Military history',
      pages: {
        servicePeriods: {
          title: 'Service periods',
          path: 'military-history/service-periods',
          uiSchema: {
            'view:serviceRecordNotification': {
              'ui:description': serviceRecordNotification,
            },
            toursOfDuty: toursOfDutyUI,
          },
          schema: {
            type: 'object',
            properties: {
              'view:serviceRecordNotification': {
                type: 'object',
                properties: {},
              },
              toursOfDuty,
            },
          },
      },
    },
   ...
};

export default formConfig;
Example 2
This is an example from the Military History page on the 686C-674 Form, which is used to add or remove a dependent on VA disability benefits.

From the formConfig for the 686C-674 Form:
import {
  veteranInformation,
  ...
} from './chapters/veteran-information';
...
const formConfig = {
  ...
  chapters: {
    ...
    veteranInformation: {
      title: "Veteran's information",
      pages: {
        veteranInformation: {
          path: 'veteran-information',
          title: 'Veteran Information',
          uiSchema: veteranInformation.uiSchema,
          schema: veteranInformation.schema,
        },
        ...
      },
    },
    ...
};

export default formConfig;
From the VeteranInformationComponent component of the 686C-674 Form:
import React from 'react';
import Telephone, {
  CONTACTS,
} from '@department-of-veterans-affairs/component-library/Telephone';
import { connect } from 'react-redux';
import moment from 'moment';

const VeteranInformationComponent = ({
  user: {
    gender,
    dob,
    userFullName: { first, last },
  },
}) => {
  let dateOfBirthFormatted = '-';
  let genderFull = '-';
  if (dob) {
    dateOfBirthFormatted = moment(dob).format('MMMM Do YYYY');
  }
  if (gender === 'M') {
    genderFull = 'Male';
  } else if (gender === 'F') {
    genderFull = 'Female';
  }
  const alertContent = (
    <dl className="vads-u-margin--0">
      <dt className="vads-u-line-height--4 vads-u-padding-bottom--2 vads-u-font-size--base">
        <strong>
          {first} {last}
        </strong>
      </dt>
      <dd className="vads-u-line-height--4 vads-u-padding-bottom--2 vads-u-font-size--base">
        Date of birth: {dateOfBirthFormatted}
      </dd>
      <dd className="vads-u-line-height--4 vads-u-font-size--base">
        Gender: {genderFull}
      </dd>
    </dl>
  );
  return (
    <div>
      <p>This is the personal information we have on file for you.</p>
      <va-alert status="info">{alertContent}</va-alert>
      <p>
        <strong>Note:</strong> If you need to update your personal information,
        please call Veterans Benefits Assistance at{' '}
        <Telephone contact={CONTACTS.VA_BENEFITS} /> between 8:00 a.m. and 9:00
        p.m. ET Monday through Friday.
      </p>
    </div>
  );
};

const mapStateToProps = state => ({
  user: state.user.profile,
});

export default connect(mapStateToProps)(VeteranInformationComponent);
Help and feedback
Get help from the Platform Support Team in Slack.
Submit a feature idea to the Platform.
