

Last Updated: June 2, 2026
Feature toggles can be used in both vets-api and vets-website to manage unreleased features. This guide describes how to use feature toggles to test out new functionality (applications, features, VA.gov content pages, Metalsmith) in the development, staging, or production environments for a set of users.
Feature toggles:
-
Allow for production toggle switching without redeploying vets-website
-
Provide a user interface for managing feature toggle behavior
-
Provide code helpers for handling common user experience scenarios
-
Are powered by an open-source gem called Flipper gem
Vets-API Flipper UI endpoints:
-
Local development (http://localhost:3000/flipper/features) (<--To view this link, ensure you have the vet-api server running locally.)
Writing good feature toggles
Keep the following items in mind as you add feature toggles:
-
Remember that each environment has its own set of feature toggle values.
-
Test your feature toggle in staging before using it in production.
-
Remove feature toggles as soon as they are not needed.
-
Make toggles that are easy to delete by gating a behavior in as few places as possible. It's often better to have blocks of repeating code that can be quickly deleted later than it is to gate several small pieces of code.
After a page is rendered, the feature toggle client retrieves the latest toggle values from the feature toggle service and the page is updated using the latest feature toggle values. The application shows a loading state for the new feature while the toggle values are retrieved from the service.
Adding a new feature toggle (frontend)
Follow these steps to add and use a new feature toggle in vets-website.
1. Determine your feature toggle name
There are no naming conventions. Current examples put the application name first, such as facilityLocatorShowCommunityCaresand profileShowDirectDeposit.
2. Add the feature name to vets-api by updating config/features.yml
features:
 app_name_then_your_feature_name:
   actor_type: user
   description: >
     This describes what the feature does and
     which team is responsible for the toggle.
Be sure to use snake case for the feature name.
3. Determine how you want the feature toggle to be "sticky"
-
For the behavior to be consistent across all devices for a logged in user choose user as the
actor_type. -
For the behavior to be consistent for a user for the duration of a cookie within a single browser, regardless of their logged in status choose cookie_id as the
actor_type.
4. Run vets-api locally
This can be done on main after your pull request (PR) is merged or off of your feature branch.
Navigate to http://localhost:3000/flipper/features and verify that you see your new feature name. If not, restart your rails server.
5. Add the feature toggle name to vets-website by updating featureFlagNames.json
The file path is src/platform/utilities/feature-toggles/featureFlagNames.json
{
 "appNameThenYourFeatureName": "app_name_then_your_feature_name"
}
The key should be camelCase for use in JavaScript, but the value should exactly match the toggle name in features.yml.
6. Submit a PR for each feature
Cross-linking the PRs in a comment will make it easier for the reviewers to check.
7. Access a feature toggle value through the Toggler component
Import the Toggler and then use the compound components to display and hide any child components based on the feature toggle value. The Toggler component includes the TOGGLE_NAMES and Enabled/Disabled components, so just a single import is all that is needed:
import { Toggler } from 'platform/utilities/feature-toggles';
<Toggler toggleName={Toggler.TOGGLE_NAMES.someToggle}>
    <Toggler.Enabled>
        <p>Enabled</p>
    </Toggler.Enabled>
    <Toggler.Disabled>
        <p>Disabled</p>
    </Toggler.Disabled>
</Toggler>
Alternatively, you can use a High Order Component (HOC) to access the toggle value within the render props. This can be useful for use inside a Class Based Component, or if you need to do something other than just conditionally rendering based on the value.
<Toggler.Hoc toggleName={Toggler.TOGGLE_NAMES.someToggle}>
        {toggleValue => <p>{toggleValue ? 'Yay it is enabled' : 'Boo it is disabled'}</p>}
</Toggler.Hoc>
8. Use the useFeatureToggle hook
This hook returns a secondary hook useToggleValue along with the main list of toggles TOGGLE_NAMES. The useToggleLoadingValue hook can be useful to verify that the toggles have loaded before doing a certain action like requesting data from an api and thus preventing a race condition around the toggle state.
import {useFeatureToggle} from 'platform/utilities/feature-toggles';
// inside a functional component we can now use the hook to access values as needed.
const { useToggleValue, useToggleLoadingValue TOGGLE_NAMES } = useFeatureToggle();
// boolean value to represent if toggles are still loading or not
const togglesLoading = useToggleLoadingValue()
// value of specific toggle
const toggleValue = useToggleValue(TOGGLE_NAMES.someToggle);
...
9. Use the Flipper UI to test out the toggle locally
Refresh the page to update the feature toggle state. This value can take up to a minute to update in staging and production.
Adding a new feature toggle (backend)
To add and use a new feature toggle in vets-api, follow these steps.
1. Determine your feature toggle name
There are no naming conventions. Current examples put the application name first, such as facilityLocatorShowCommunityCaresand profileShowDirectDeposit.
2. Add the feature name to vets-api by updating config/features.yml
features:
   app_name_then_your_feature_name:
      actor_type: user
      description: >
        This describes what the feature does and
        which team is responsible for the toggle.
Be sure to use snake case for the feature name.
3. Determine how you want the feature toggle to be "sticky"
-
For the behavior to be consistent across all devices for a logged in user choose user as the
actor_type. -
For the behavior to be consistent for a user for the duration of a cookie within a single browser, regardless of their logged in status choose cookie_id as the
actor_type.
4. Run vets-api locally
This can be done on master after your pull request (PR) is merged or off of your feature branch.
Navigate to http://localhost:3000/flipper/features and verify that you see your new feature name. If you don’t, restart your rails server.
5. Testing
When writing specs, make sure to test both flipper-off and flipper-on scenarios. See more information about testing on the Flipper Usage In Specs page.
Backend example
def base_method_name(params)
  if Flipper.enabled?(:feature_flag, @current_user)
    base_method_name_feature_enabled(params)
  else
    base_method_name_feature_disabled(params)
  end
end
def base_method_name_feature_enabled(params)
  # How it behaves with the feature toggle enabled
end
def base_method_name_feature_disabled(params)
  # How it behaves without the feature toggle enabled
end
### spec
RSpec.describe Object do
  context "Feature feature_flag=true" do
    before do
      # Recommended to limit the feature flag state to the scope of this test
      allow(Flipper).to receive(:enabled?).with(:feature_flag).and_return(true)
      # Not recommended. Affects global state and can have unintended side effects when tests run in parallel
      Flipper.enable(:feature_flag)
    end
    it "behaves this way with the feature enabled" do
    end
  end
  context "Feature feature_flag=false" do
    before do
      # Recommended to limit the feature flag state to the scope of this test
      allow(Flipper).to receive(:enabled?).with(:feature_flag).and_return(false)
      # Not recommended. Affects global state and can have unintended side effects when tests run in parallel
      Flipper.disable(:feature_flag)
    end
    it "behaves this way with the feature disabled" do
    end
  end
end
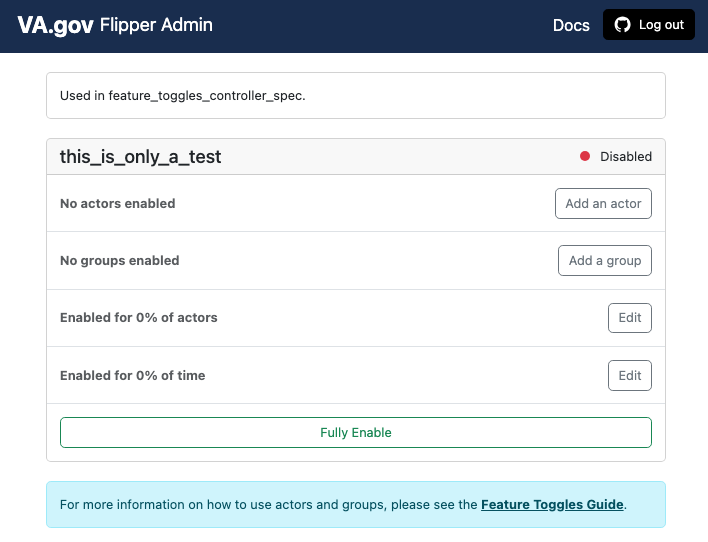
Enabling and disabling features using the Flipper UI
1. Access Flipper UI
You can enable or disable features in the Flipper UI. It exists in all environments, and can be accessed by visiting the endpoint /flipper/features in each of the respective environments (i.e. https://api.va.gov/flipper/features).
To access most features within the Flipper UI, you must sign in with GitHub, and be authorized to do so. Please see Flipper UI Access for more information on requesting access to these features.
2. Configure Flipper UI settings
Once you have logged into the Flipper UI, you can define configuration settings to determine who can see your new feature.
The values of each toggle are cached in memory for one minute, so it may take that long to see the effect of enabling or disabling the toggle.
|
Configuration option |
Use case |
|---|---|
|
Enable/Disable for Everyone |
Enable or disable the feature for all users. |
|
Enable for Actors (Users) |
Add individual email address to Actors section to enable the feature for a select group of users Email addresses in the Flipper UI are case sensitive. For performance reasons, the list of users is intended to be small — do not use this option for hundreds of users. |
|
Enable for a Group of Actors |
Enable a feature for a group of registered users. Note: There are currently no groups registered in vets-api (as of 10/2024). Please see Flipper UI docs for information on creating a group and/or reach out to Platform Support |
|
Enable for a Percentage of Actors |
Feature rollouts are evaluated independently per actor using the configured percentage.
|
|
Enable for a Percentage of Time |
Enable a feature for all users for a percentage of time. |
Percentage of Logged in Users functions independently of percentage of time. If you enable 50% of Logged in Users and 25% of time, then the feature will always be enabled for 50% of Logged in Users and occasionally enabled 25% of the time for everyone.
To roll out a feature to anonymous users, see Staggering features to anonymous users.
Removing old/unused feature toggles
Once a feature toggle is “retired” (The goal EVERY team should be striving for!), a few steps must be taken, and some of them are less obvious
-
Remove all reference to your
:feature_toggle_namein vets-website. -
Remove all reference to your
:feature_toggle_namein vets-api, including the flipper definition fromconfig/features.yml. Note: If the vets-api removal is deployed before the vets-website changes, your features will be turned off by default regardless of the flipper settings. -
Verify the
config/features.ymlchanges have been deployed to production before proceeding. -
(Less obvious) - Delete feature from the respective databases
-
How to remove feature toggles from the DB’s Flipper table:
-
Feature toggles can be removed by running
Flipper.remove(:feature_name)in the Rails console for each environment-
Note that each env (dev/staging/sandbox/prod) has their own table to track the state of each flag, so the command must be run in each env.
-
-
If you nor anyone on your team have access to [all environments of] ArgoCD, you may submit a support request to have a Support engineer perform the command for you.
-
⚠️ ⚠️ Make sure features are not removed from the DB until AFTER the commit removing the flag from
features.ymlhas propagated to the respective deployed app (Dev/Staging happen soon after merging master, while Production/Sandbox get manually deployed ~1pm ET each day). Otherwise, if the app deploys again, it will recreate any flipper records found infeatures.yml
-
-
NOTES:
-
features.ymlis used to POPULATE the database that Flipper uses to hold the state of a given feature flag. It DOES NOT, however DELETE the DB entry upon getting removed fromfeatures.yml -
For years we had a job that ran daily to clean up the Flipper tables, removing flippers that were no longer in
features.yml. This job was disabled due to some strange behavior in which features were unintentionally disabled (Yikes) -
Platform has this on our radar, and we’re looking at potential solutions (beyond just “debugging” the tool)
-
-
Creating a toggle and turning it on or off (Frontend)
When running a new vets-website build, the script will fetch all CMS feature toggles from Drupal. This allows the toggles to be controlled from within Drupal.
Before writing any code to use a new feature toggle, it must first be created from within Drupal for all three environments. The feature toggles for dev can be found at https://dev.cms.va.gov/admin/config/system/feature_toggle (only accessible behind the VA Network [CAG/AVD, or GFE]). Staging and production have similar pages.
The new feature toggle must be in every Drupal environment or vets-website builds will fail when we try to use it! This is intentional so we don't have "accidentally" false feature toggles when Drupal doesn't have a toggle that vets-website is trying to use.
Using toggles in GraphQL queries
Because the toggles are fetched dynamically, they aren't stored in a file that we can require from a GraphQL query file. The build script puts the current toggles are put into global.cmsFeatureFlags after it either fetches the most recent toggles or uses the cache.
Keep in mind the advice in the paragraph at the top of this page called “Writing good feature toggles.” You should write the logic in a way that is easy to remove later. It's often easier to change some logic and then add a conditional that modifies something with the toggle is not enabled. That lets you simply remove the conditional later.
Using feature toggles in Liquid templates
All liquid templates have access to the current feature toggle state:
{% if enabledFeatureFlags.feature1 == true %}
  <div>Fancy new feature</div>
{% endif %}
From within the JavaScript context, the feature toggles are in global.cmsFeatureFlags, but within the Liquid template context, they can be found in enabledFeatureFlags.
Help and feedback
-
Get help from the Platform Support Team in Slack.
-
Submit a feature idea to the Platform.