

Last Updated: January 28, 2025
This page walks you through the process of setting up a testing environment for user research sessions using GitHub Codespaces. To streamline the process, we will use vets-website without the content-build process, and implement a mock server to handle API calls. This approach allows for faster setup and a more controlled testing environment in that the frontend can be updated on the fly, and mock responses for API calls can be tailored to the needs of the research study.
Configuring the Codespace environment variables
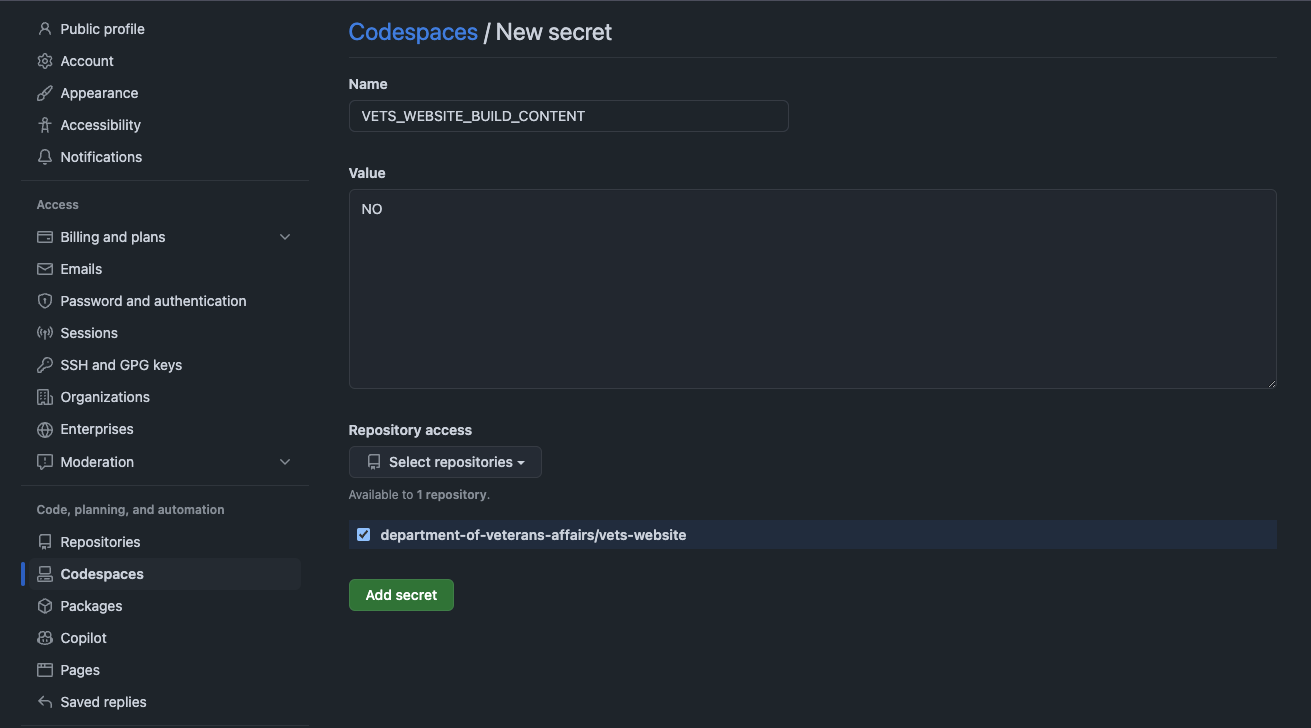
To configure a Codespace to not try and run content-build, you need to add some encrypted secrets to your individual GitHub account settings. You can read docs on account-specific secrets for more information.
-
In your GitHub account settings, go to Codespaces.
-
Add an encrypted secret with the name
VETS_WEBSITE_BUILD_CONTENTand valueNO. -
Make this secret accessible to the
vets-websiterepository.
Note: This configuration will significantly speed up the Codespace creation process.
Setting up your Codespace
-
Navigate to the vets-website GitHub repository.
-
Select the branch that you would like to run your Codespace from. You may change this after the Codespace has been spun up, so starting on the main branch is fine.
-
Click the green "Code" button and select "Open with Codespaces"
-
If this is your first time, select "New codespace".
-
You should then be redirected to a browser based version of Visual Studio Code with the vets-website repo open to the branch that the Codespace was created from.
-
You can view the Codespaces creation log and verify that the codespace-create script has run, and then proceed to the rest of the setup.
Note: Due to the VA GitHub organization settings, your Codespace will automatically use a 16-core, 64GB RAM, 128GB disk space container. This cannot be changed at this time.
Setting up the mock server
We'll use the mocker-api package to mock API responses. The vets-website repository already includes example responses and the necessary dependencies.
-
Navigate to the vets-website directory in your Codespace.
-
Start the mock server in the terminal using the following command:
yarn mock-api --responses src/platform/testing/local-dev-mock-api/common.js
This command starts the mock API using pre-configured responses. These common responses are just an example, and only provide the user, maintenance_windows, and feature_toggles responses, so you’ll want to create your own responses file to fit your needs. There are more in-depth examples of mock server files to serve as inspiration that have been used for the profile, appeals, and check-in applications.
Mocker-api is a wrapper around an express server, so the traditional request and response arguments can be used within any endpoint callback to handle dynamic responses, and to help create the response data that's required in more complex scenarios.
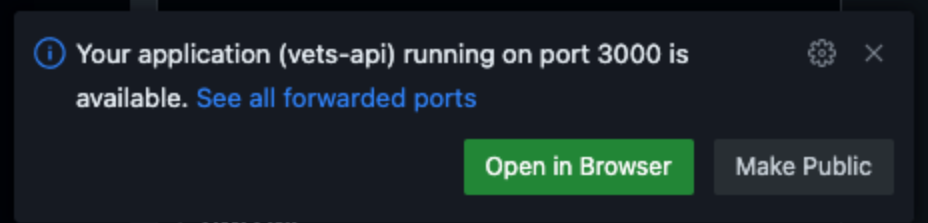
Making the mock API public
To use the mock API URL in your Codespace, do the following:
-
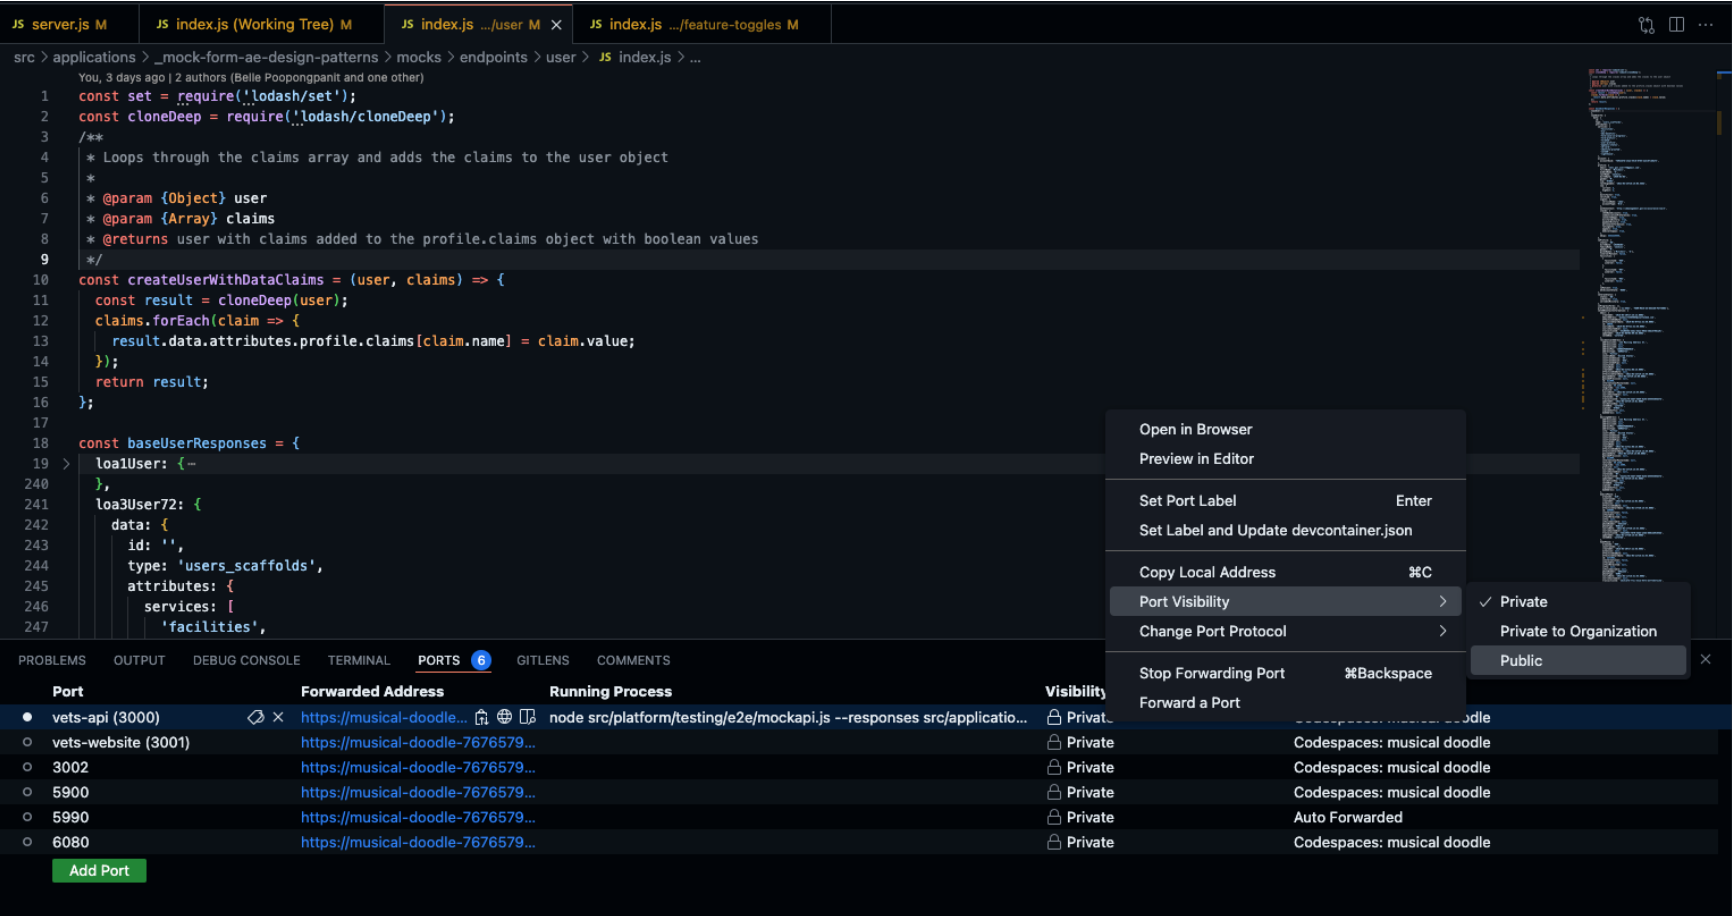
In the Codespace, click on the "Ports" tab in the bottom panel.
-
Find the port where your mock API is running (likely 3000).
-
Right-click on the port and select "Port Visibility" -> "Public".
-
Copy the public URL provided for this port.
Changing the visibility of a port after it’s running:
Running the frontend development server
-
Open a new terminal in your Codespace.
-
Make sure you're in the vets-website directory.
-
Start the development server, using the public URL of your mock API:
yarn watch --env entry=profile,auth,static-pages api=https://your-public-mock-api-url-here -
Replace
https://your-public-mock-api-url-herewith the actual public URL of your mock API. -
Replace the entry strings with the application names that you would like built.
Note: You can run the watch command for all the apps as well, but that makes the build time significantly longer.
Making the frontend public
-
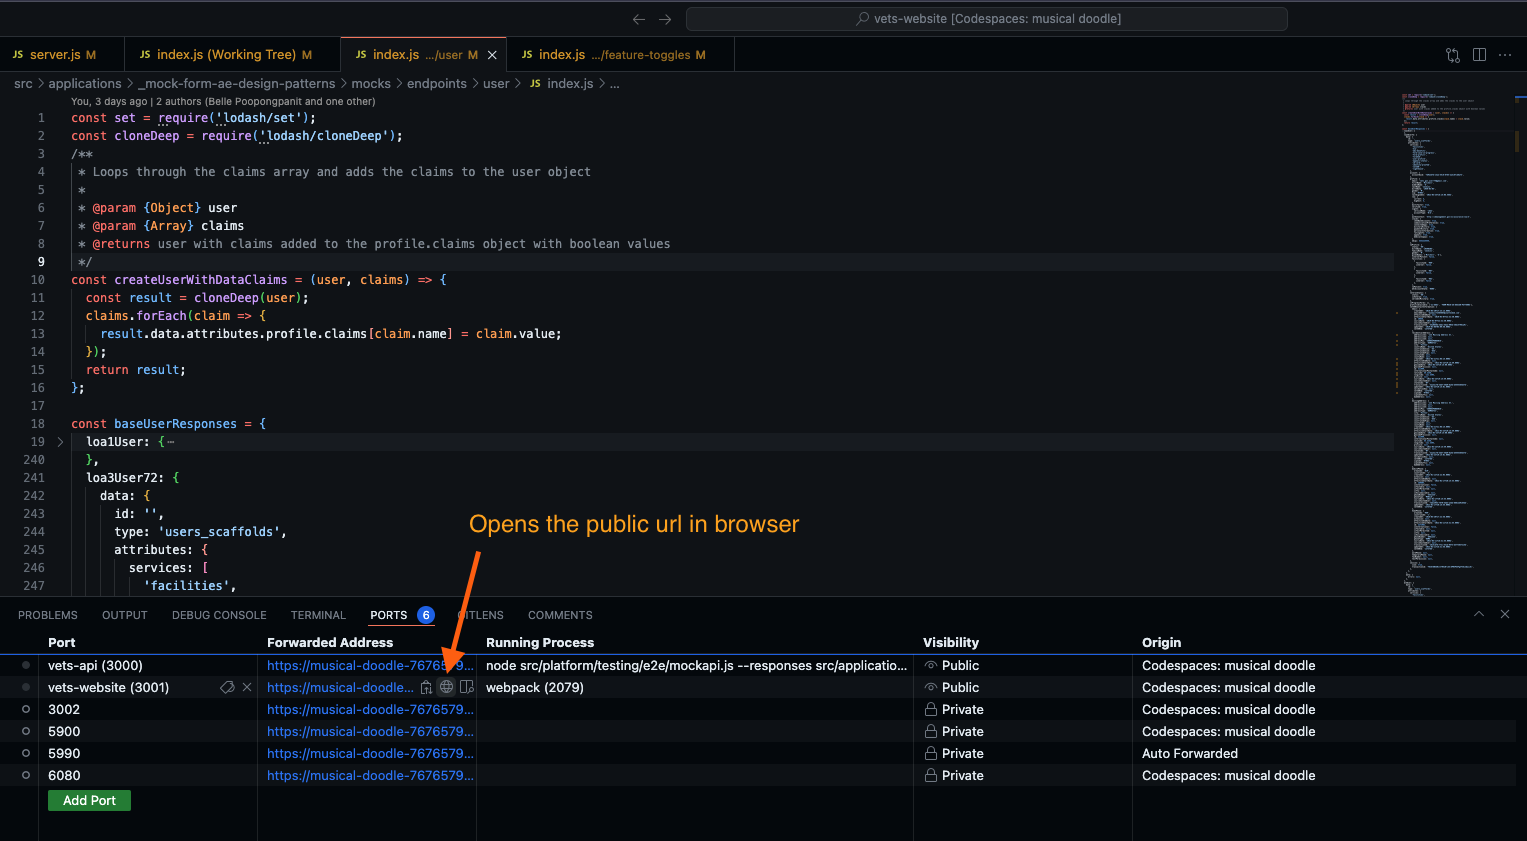
In the Codespace, go to the "Ports" tab again.
-
Find the port where your frontend is running (typically 3001).
-
Right-click on this port and select "Port Visibility" -> "Public"
-
Copy the public URL provided for this port. Users can now access the frontend using this public URL.
Note: The public URL will be the same for the entirety of the Codespace's life, but it is randomly generated by GitHub and cannot be changed. The only way to get a new/different URL is to create a new Codespace instance.
Managing Codespace timeout and cost
Codespace usage for the vets-website repository is not free and is paid for by Department of Veterans Affairs. View the billing costs for Git Hub Codespaces.
Review the guidelines below to minimize costs whenever possible.
Increasing the Codespace timeout
By default, Codespaces will timeout after a period of inactivity. The default timeout is 30 minutes. To increase this timeout, do the following:
-
Go to your GitHub account settings.
-
Navigate to Codespaces.
-
Under "Default idle timeout", select a longer duration (up to 240 minutes).
-
Click "Save".
Note: This setting will apply to all your future Codespaces across all repositories.
Understanding Codespace inactivity
A Codespace is considered inactive when:
-
there's no keyboard or mouse activity in the remote environment (usually the VS Code browser-based editor).
-
there are no active processes or jobs running in the terminal.
-
there's no active port forwarding or preview.
Note: Having the Codespace tab open in your browser does not count as activity. As long as some sort of edits are being made to a file in a Codespace it should remain active.
Minimizing Codespace costs
To optimize the costs associated with Codespaces, do the following:
Stop your Codespace when not in use
-
In the Codespaces interface, click on the ellipsis (...) next to your Codespace.
-
Select "Stop codespace".
Note: This does not completely remove the Codespace, so the URLs that are used will remain the same when it is restarted. You will need to restart your frontend and mock api server after restarting a Codespace. They do not start automatically.
Delete unnecessary Codespaces
-
Go to your GitHub Codespaces page.
-
Click on the ellipsis (...) next to the Codespace you want to remove.
-
Select "Delete".
Note: Stopped Codespaces still incur storage costs, but are significantly lower than active Codespace costs.
Preparing for user research sessions
-
Ensure all necessary features are working with mock data and that the server and frontend ports are public. If you have to restart the server after inactivity, you may lose the public status of the ports, so double-check them.
-
Test the environment thoroughly before the research session in an incognito window.
-
Provide the public frontend URL to your research participants. A link shortening service like Bitly may be used to make the links easier to copy and paste or send in messages.
-
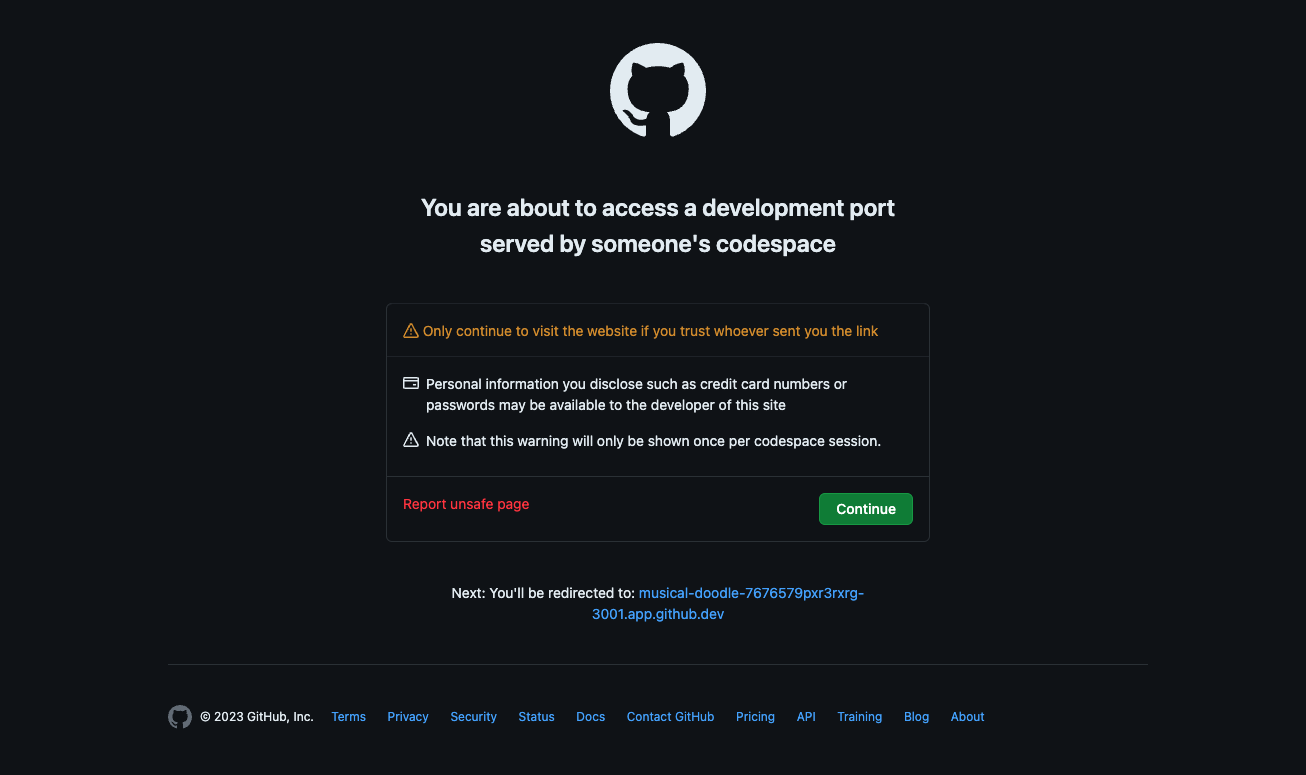
An initial 'landing page' will be shown to the users when they first visit the Codespace URL.
-
Once the green 'Continue' button is clicked, the user will not see that landing page again for the rest of their session, but it should be explained that the Codespace is just a prototype and no personal information will be saved within this prototype.
Best practices
-
Keep your mock data up-to-date and representative of real scenarios.
-
Document any specific setup steps required for different applications or features.
-
Regularly update your Codespace to ensure you're working with the latest vets-website code or that your Codespace is using the branch of vets-website that is required for your session. You can change to any active branch within the Codespace, so you do not need to run from the 'main' branch only.
Additional resources
Use the links below for more information:
-
Slack channel: #codespaces
Help and feedback
-
Get help from the Platform Support Team in Slack.
-
Submit a feature idea to the Platform.